 Overview
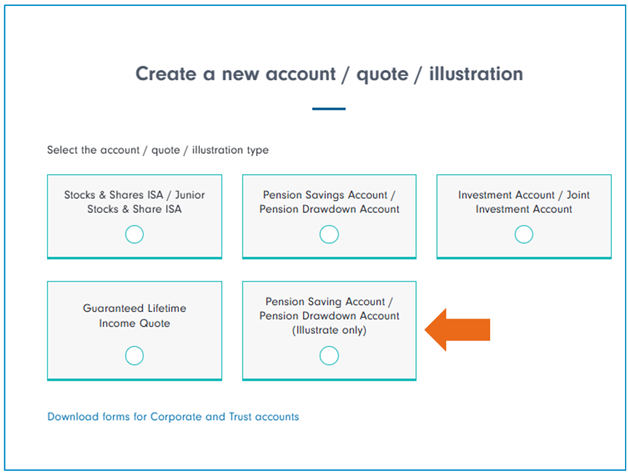
Products
Cash Trust, Pension Trustee and Company Account Canada Life Intl. Bond Utmost offshore bonds
ISA
Pension
Investment Account
Cash, Corporate & Trust and Bonds
Cash, Corporate & Trust and Bonds
Cash Trust, Pension Trustee and Company Account Canada Life Intl. Bond Utmost offshore bonds
Client administration
Account opening Our bank details Flexible Investment and Retirement Solutions Re-registration & transfers Account dealing Withdrawals and account closing Amending client details Bereavement Power of Attorney & Court of Protection Fees and charges Information-only advisers Stock Transfer Delink a client
Client administration help
Client administration help
Account opening Our bank details Flexible Investment and Retirement Solutions Re-registration & transfers Account dealing Withdrawals and account closing Amending client details Bereavement Power of Attorney & Court of Protection Fees and charges Information-only advisers Stock Transfer Delink a client
Pre-sale illustrations
By selecting the tabs below, you can find more information on the following:
- Features of the service
- How the service works
- Pre-sale illustrations
- Initiating a pension stock transfer
- Best practice for new accounts
To fully support the advice process and the need to disclose costs and charges, provide projections and other key product information to clients, standalone pre-sale illustrations are produced as part of the service. Following the client’s agreement to your recommendations, the process then moves onto the execution phase – crystallising assets (if applicable), stock transfers to create new accounts, and the setting of the investment strategy for each account.
How to create an illustration
To create an illustration, simply open the client or prospect and select ‘Create illustration’ on the Account Summary screen, then select the Pension Savings Account / Pension Drawdown Account (Illustrate Only) option and click continue. You can then add the Pension Savings Accounts and Pension Drawdown Accounts, as required.
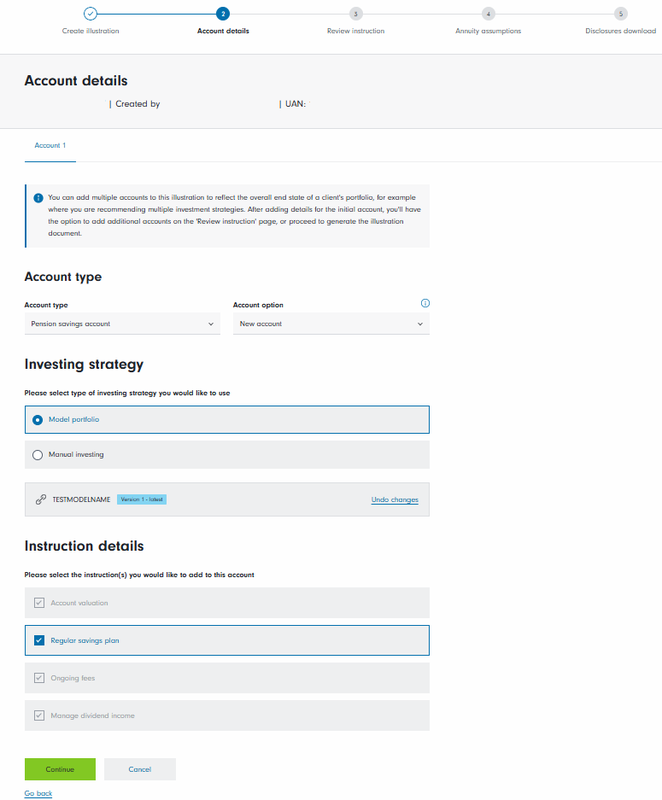
The first step is to define the investment approach for the account – select either ‘Model Portfolio’ or ‘Manual investing’. If using a Model Portfolio, you can then select the Model Portfolio you would like to use for the account.
You can then indicate whether any instructions need to be added to the account (the precise details will be added in the next stage of the process).
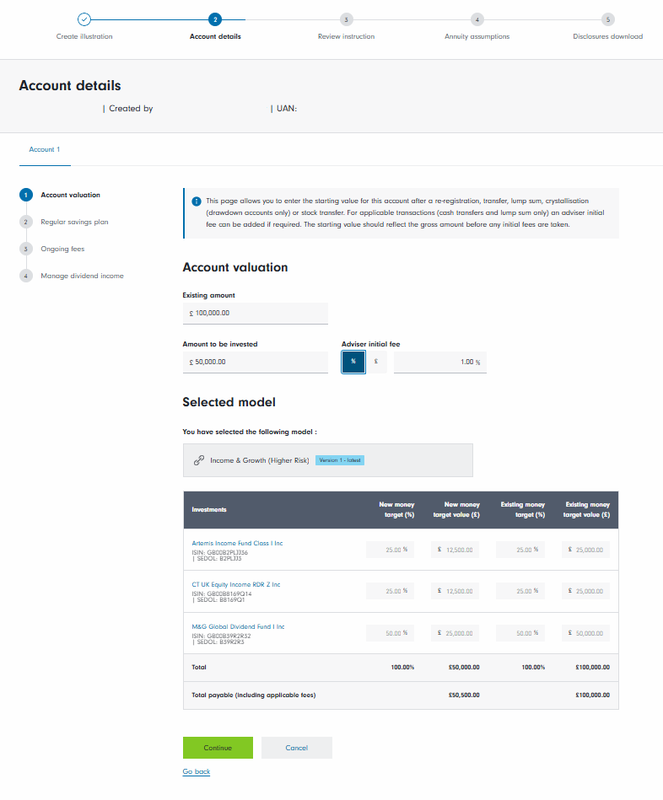
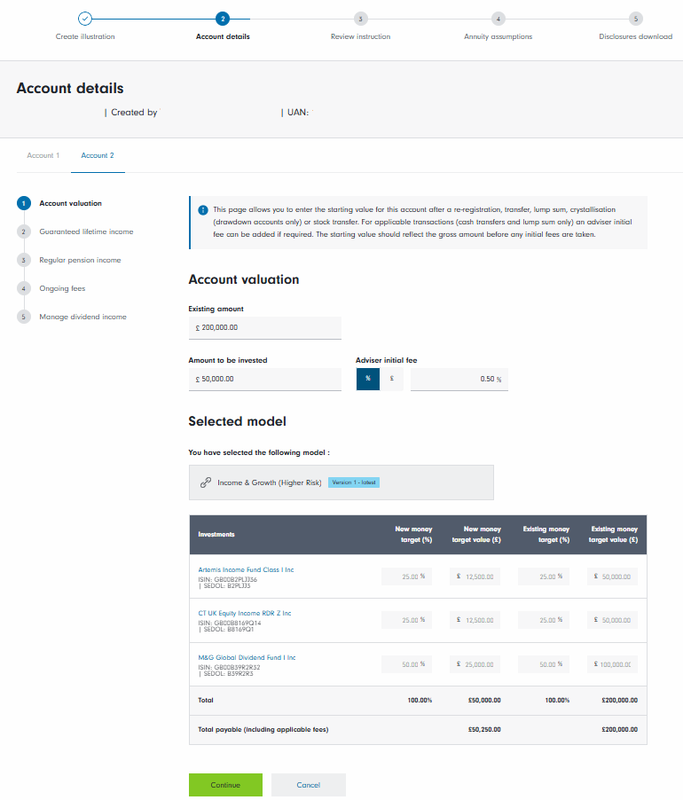
The next step is to enter the starting value once the transfer has taken place.
- Enter the starting value of the account (the amount before any fees are taken)
- Enter your firm’s initial fee, as appropriate
- If the account already exists, you can add a separate transfer in value along with an initial fee - use the ‘Amount to Invest’ box to enter this amount
- You can then choose the investments (manual approach) or, if a model portfolio approach has been selected, the model will already be shown.
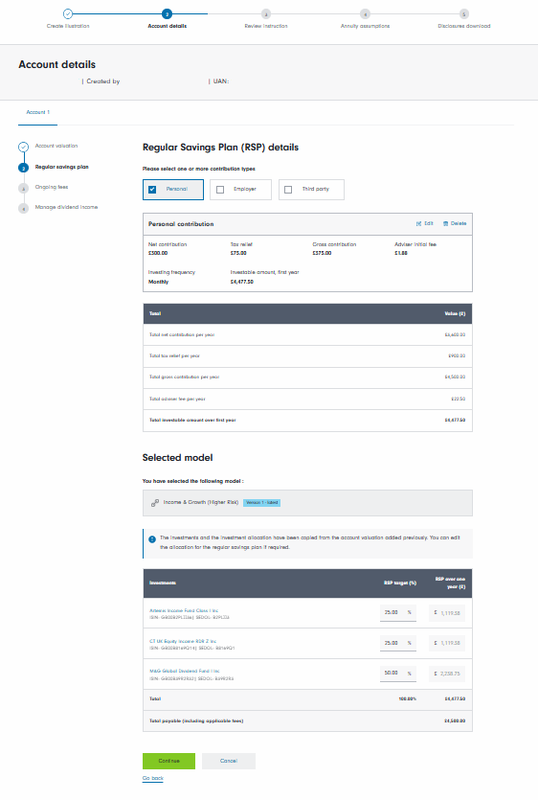
Now add the details of any regular savings plans.
- Enter the details of the contributions (Personal, Employer, and Third-party options are available). You can enter the Net Amount, and the system will calculate the tax relief and gross amount
- Enter the investments, if applicable (this will be pre-populated if a model portfolio has been selected)
The next stage is to add the details of the ongoing fees that will apply to the account.
- Enter your firm’s Adviser Ongoing Fee
- Enter the DFM Ongoing Fee (if applicable)
- Define how fees should be funded in the event of a shortfall. The options are to use the default approach or to select one of the investments to be used as a source of the fee if enough cash is not available.

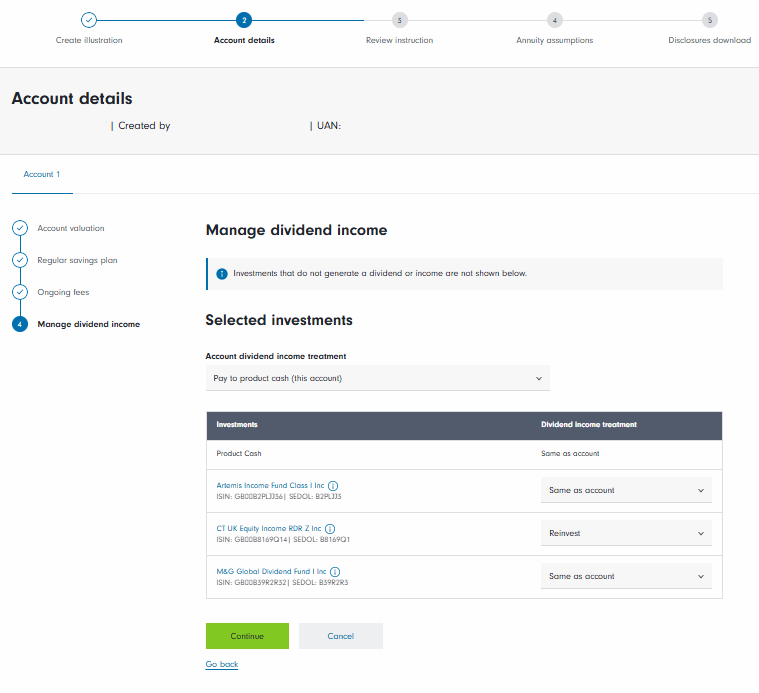
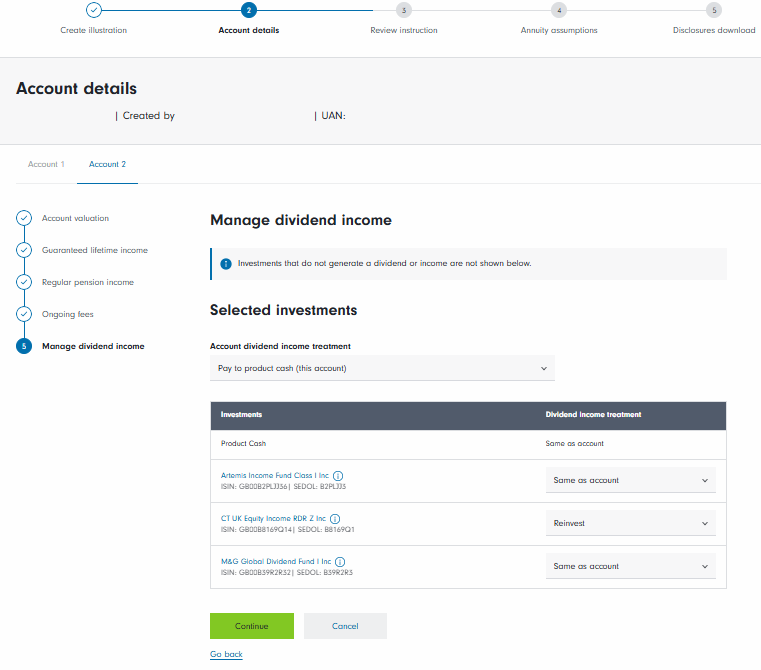
Finally, define how any dividend income should be treated.
- Enter the top-level account setting
- Enter individual investment level overrides, if required.
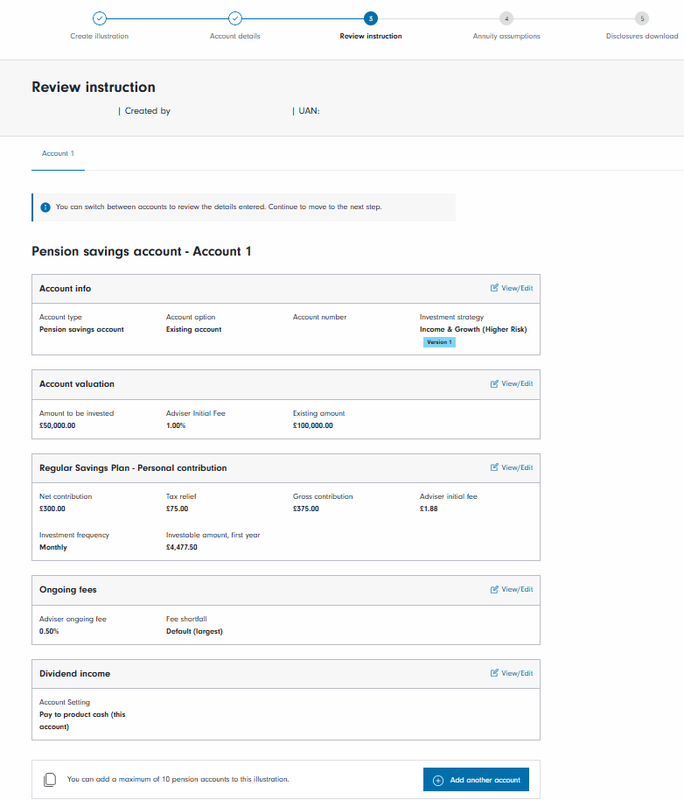
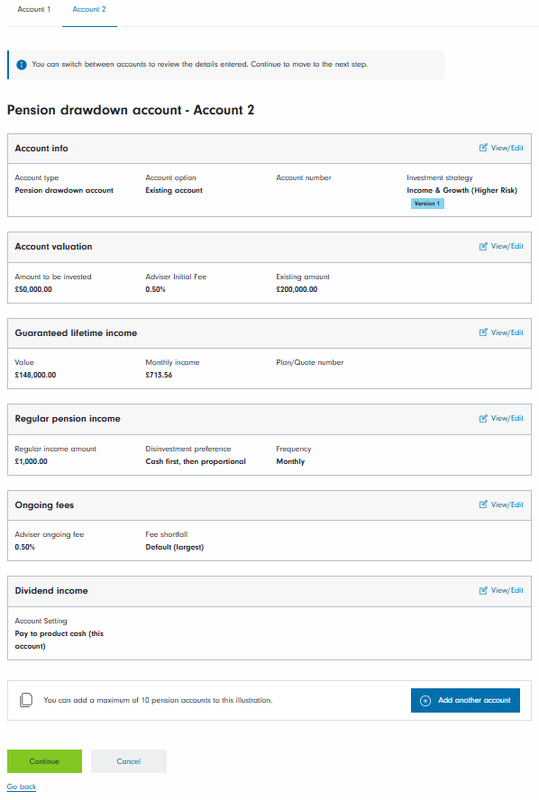
A summary of the account(s) is now shown.
- Accounts can be edited, if required
- If all accounts have been added, you can move to the illustration phase
- If other accounts are required, click the ‘Add another account’ button.
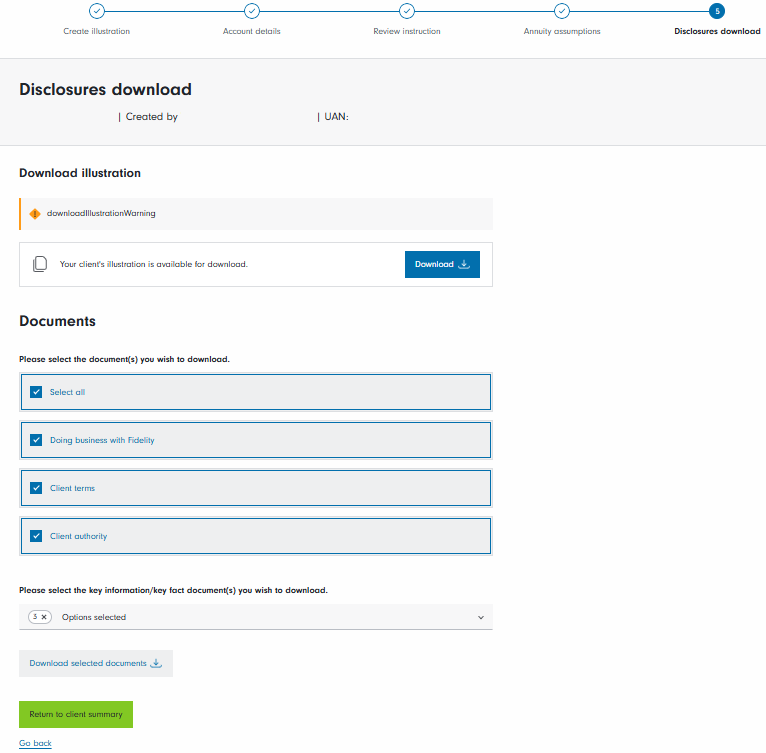
A personal illustration can now be downloaded. You also have the option to download:
- Client terms
- Doing business with Fidelity document
- Client Fee Authority form
- Fund documents.
Please note: where multiple accounts and funds have been specified, it can take over a minute to generate the illustration.
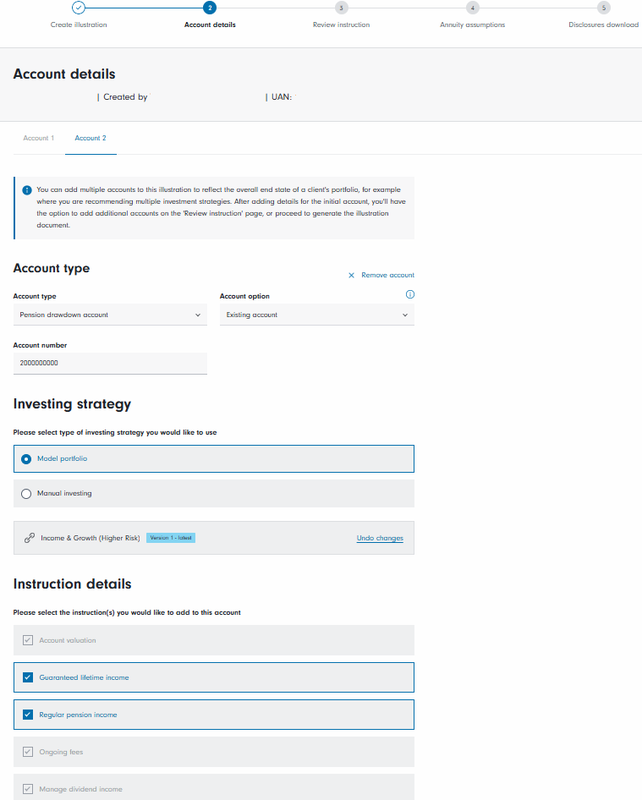
The first step is to define the investment approach for the account – select either ‘Model Portfolio’ or ‘Manual investing’. If using a Model Portfolio you can then select the Model Portfolio you would like to use for the account.
You can then indicate whether any instructions need to be added to the account (the precise details will be added in the next stage of the process).
The next step is to enter the starting value once the transfer has taken place.
- Enter the starting value of the account (the amount before any fees are taken)
- Enter your firm’s initial fee, as appropriate
- If the account already exists, you can add a separate transfer in value along with an initial fee - use the ‘Amount to Invest’ box to enter this amount
- You can then choose the investments (manual approach) or, if a model portfolio approach has been selected, the model will already be shown.
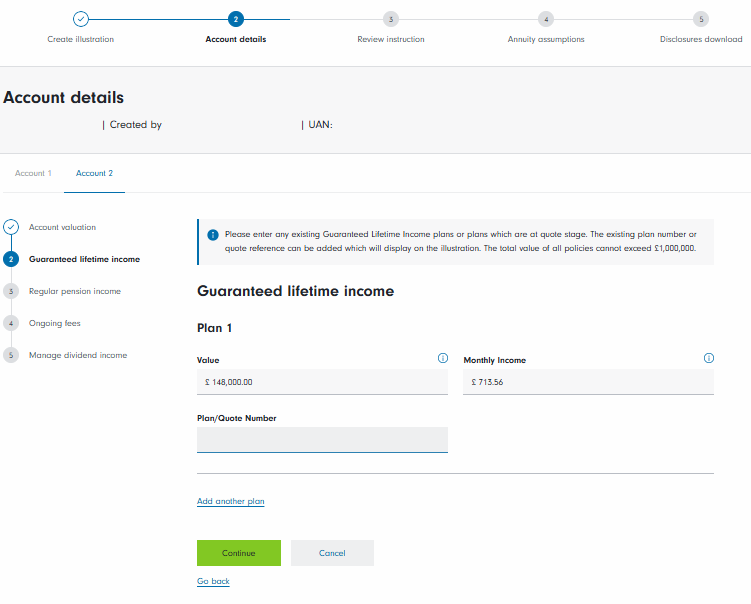
If this option is required:
- Enter the GLI value and monthly income (from the illustration or the existing GLI account)
- Enter the GLI plan or quote number.
Up to 10 GLI tranches can be added to the illustration.
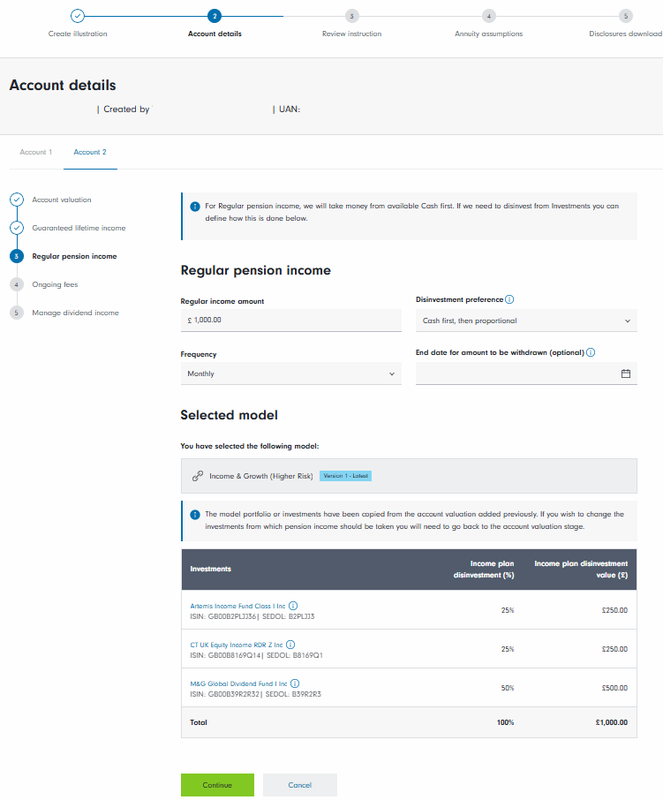
If a pension income is to be taken from the Pension Drawdown Account:
- Enter the regular income amount, the disinvestment approach and frequency of the payment
- The projected disinvestments for each investment are then shown.
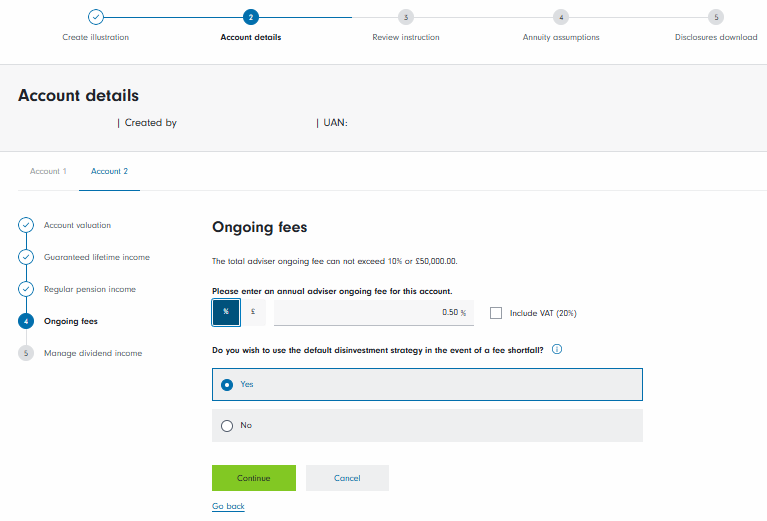
The next stage is to add the details of the ongoing fees that will apply to the account.
- Enter your firm’s Adviser Ongoing Fee
- Enter the DFM Ongoing Fee (if applicable)
- Define how fees should be funded in the event of a shortfall. The options are to use the default approach or to select one of the investments to be used as a source of the fee if enough cash is not available.
Now define how any dividend income should be treated.
- Enter the top-level account setting
- Enter individual investment level overrides, if required.
A summary of accounts is now shown.
- Accounts can be edited, if required
- If all accounts have been added, you can move to the illustration phase
- If other accounts are required, click the ‘Add another account’ button.
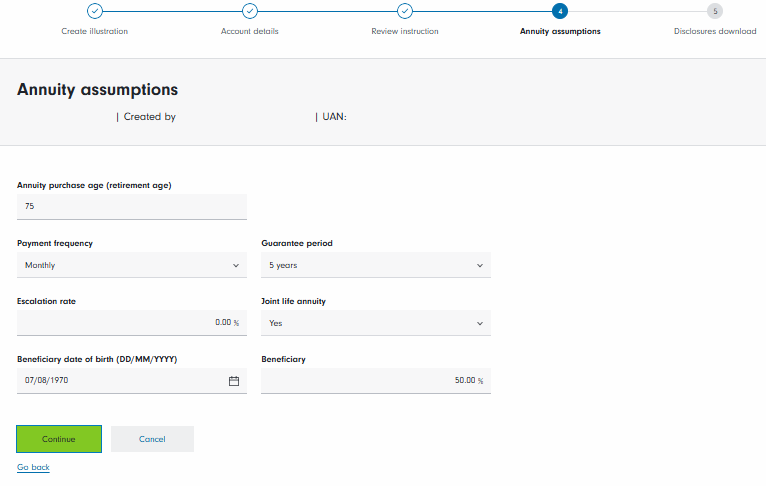
Finally, add the annuity assumptions.
- Enter the individual’s age along with the other requested details
- Add a beneficiary, if required, with a percentage.
A personal illustration can now be downloaded. You also have the option to download:
- Client terms
- Doing business with Fidelity document
- Client Fee Authority form
- Fund documents.
Please note: where multiple accounts and funds have been specified, it can take over a minute to generate the illustration.
Related content
Standard Life Smoothed Return Pension Fund
A retirement savings and decumulation option designed for clients who are seeking less short-term volatility from their pension investment.
Standard Life Guaranteed Lifetime Income Plan
A plan designed to address the challenge of ensuring retired clients have sufficient income over their lifetimes.
Model portfolio and DFM service
Our model portfolio service allows you to create bespoke portfolios of up to 50 funds or exchange-traded investments. You can also use defined models from DFMs.